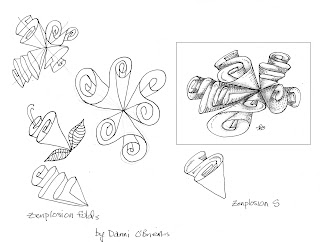
Zenplosion Folds
 I went to the 212 Cake Eater's Group yesterday and saw some wonderful fabric art. One of the fabric artists presented some lovely felted pillows she created using old sweater pieces as her medium. The pillow centerpieces were these wonderful little textured birds, they were great. It made me want to cut up my old sweaters and try them, I don't sew. Lot's of fun creative stuff. I also got to see one of the pen's (in person) that Maria Thomas uses for the introduction to the Zentangle Mooka video. I'm sure she also used it to address my lovely CZT packet! It is sooo cool. Seeing it on the video, I thought... if only I had that pen, I too would be able to immediately do the wonderful letters that I've seen her create. Then, reality struck, Maria, who has been a calligrapher and artist for most of her adult life, yeah, it's just the pen... Not!
Anyway, the day began with fabric discussions and beautiful quilts and that fabulous pen, then I went to my friend Diane's home and she showed me a book she had gotten from her sister in-law. It had templates and patterns for 3-D Explosion: Simply FABULOUS Art Quilt Illusions - by Cara Gulati. I was so impressed. Cara has wonderful free patterns online for you enthusiasts at doodlepress.com. And I saw a lovely tangle coming to life...
I can't sew, as I've said, but I can tangle. The templates in the book were simple and beautiful. Then I looked online at Doodle Press and found these student 3-D Explosion quilts pictures for inspiration, talk about INSPIRING! Beautiful.
 |
| Cara Gulati 3-D Explosion Free Patterns |
This tangle has a nice even flow with lovely curves. The folds are created with simple straight connector lines. I've been Mooka crazy all week, Mooka, Mooka, Mooka, I'm hooked. But I have to say this tangle has got me now. It's Explosion Away!!!!! I've been working on it all evening, addicting also. This Zentangle stuff can be dangerous - beware - addictive tangle ahead!
The beauty of this tangle is that it can work as a tangle pattern, or a string to incorporate other tangles. It can be created in the scrolled "S" shape... or ribbon folds... or combine both.
Zenplosion Fold - S-Curve: The essence of the explosion effect is that all patterns start from one point and "explode" out. The idea of perspective and depth is a really important part of the impact of this tangle. It looks complicated but "One Stroke at a Time" and you've got it. Hope you have fun using this pattern. Please send me your links when you post your versions.
First I draw a simple light grid (lines crossed) in pencil to designate my reference center/point (start).
- Draw a cursive scroll "S", I incorporated some light lines through the center of my "S" shape as a perspective/horizon point. I'm showing the pencil (perspective) lines a little darker here just for your drawing reference.
- Connect the inside curve to with straight connector lines to form the folds, continue connecting points down your S-curve until folds appear. When I'm drawing these connector lines, I always reference the center point as my target when drawing the connector lines.
- When drawing your fold make sure to turn your tile to get the correct orientation. Turning will make it easier to align your folds on the straight north/south line. Vary placement, size and orientation to form your composition. When overlapping folds the new lines go behind the previous fold creating depth.
Try to orient some of your folds rising up, some going downward, always beginning from the same reference point to create the "Explosion". Vary the size and orientation of each fold to add interest.
Shading: I like to add shading to increase the fold look. Just shade where you see the "material" overlapping, that's where your shadow is formed, if there is a fold there will usually be a shadow on the material behind it. Also, to give the tubular look of the folds I shade along the sides of the "cone shape" leaving the lighter highlight area in the center of the fold. Where you fold curves inward, you want to add shading to show its recessing. The curves and folds work with just the outlines but shading adds another dimension.
Zenplosion Fold - S-Curve sideways: All the directions are the same just apply to the S-Curve with spirals drawn sideways.
 |
| S-Curve - "S" shown oriented on its side |
Zenplosion Fold - Ribbon: All the how to directions are the same just apply to the simplified ribbon curves. You can incorporate a spiral shape the ribbon shape for another variation.
 |
| Ribbon Curves Variation |
 |
| Notebook Workup for Zenplosion Folds |


I like these Zenplosion folds!!!
ReplyDeleteLOVE THESE!
ReplyDeleteGreat instructions for awesome patterns!
ReplyDeleteThank you so much for sharing :-) .
Very fun! Thanks for sharing, Danni!
ReplyDeleteThis is fabulous!! Thanks so much for sharing!!
ReplyDeleteOkay, I'm hooked. This will keep me busy for a long time. Thanks.
ReplyDeletethis is fantastic. I love the perspective view and an effective design. Thanks for sharing your "how-to"
ReplyDeleteDeanne
Sydney, Australia
These "Zenplosion" folds/s-curves/ribbon curves are such a great design! Thank you for the tangle-friendly tutorials! Great job.
ReplyDeleteThanks, once you get the tangle rhythm going it's alot of fun. I look forward to seeing the tangelations on this one. Shading with your trusty pencil and blender can add a lot to this pattern.
ReplyDeleteThis is a wonderful pattern. Thank you for sharing. Great tutorials too. Can't wait to use it!
ReplyDeleteHi Danni -- Love your Zenplosion folds. I'm also going to the May Zentangle training -- we should try to find each other.
ReplyDeleteTotally agree! This is a great pattern! Thanks for all the step-by-steps! I bet this one starts popping up on the challenges!!!!
ReplyDeleteLove this pattern! Thank you for sharing it.
ReplyDeleteWhacky doo dah! So much fun, thanks Danni!
ReplyDeleteThanks. I think we will see a lot of these in the future in a lot of images.
ReplyDeleteI am a beginner at this- I love this S fold- and your picture step by step! Thank You
ReplyDeleteThis is a lovely design Danni! I've tried it a few times and would like to experiment more with it.
ReplyDelete--Margaret
Can't wait to try this one! Thanks for sharing
ReplyDeleteThank you for such FANTASTIC directions! I did it!
ReplyDeleteThese are great, thank you so much, still a beginner but getting better.
ReplyDeleteI want to draw these! I have tried a couple of times with no luck, but I am not giving up! Thanks for the great details and easy to follow instructions!
ReplyDelete